Creating an Account
Step 1: Register on goPricer.com:
- Each individual user should register for their own goPricer account (here). Your account is then linked to your brokerage on the back-end. You can have as many user accounts for your brokerage as you’d like; everyone will see the same inventory.
- After signing up, you will be asked to submit your StubHub credentials. This will allow us to retrieve your StubHub API key, which is used for a number of things, such as what events you have Incentive Discounts for. Note that we only store your Stubhub API Key; your StubHub username and password are never saved.
Step 2: Send us your Skybox API Key:
1. Login to Skybox.
2. Click on the top left ‘Logged in as’ area to bring down the dropdown menu.
3. Select ‘Integration Settings’.
4. Select ‘API Invitation’ from the top bar.
5. Enter ‘api@gopricer.com’ in both the Recipient and Description fields.
6. Send it!
Step 4: Sit back and wait…
- We’ll email you once your inventory has been imported and your account is good to go. This usually takes a few hours.
Searching for Events
Using the Search Box:
The search box can accept any combination of:
- Event Name
- Venue
- City
- Section
- Row
- Date
Ex: “Reds 5/16” brings up the Cincinnati Reds game on 5/16
Ex: “Reds Terrace Outfield” brings up all Terrace Outfield tickets for Cincinnati Reds games.
Ex: “Prudential Center 202” brings up all tickets in section 202 for events at the Prudential Center.
Home Team Only:
For sports, after you type a search term that contains a team name, there will be a ‘Home Team’ filter box that will appear to the right of the search box. From there, you can select a team so that the interface will only show that team’s home games. To remove the filter, click the red ‘X’ that appears to the right of the search box.

Season Tickets:
For season tickets, you can quickly filter to see just that ticket for all [81,41,etc] home games in the season by clicking the ‘Show Season’ icon to the right of the Row listing for that ticket. To remove the filter, click the ‘X’ in the ‘Show Season Filter’ tag that appears to the right of the search box.

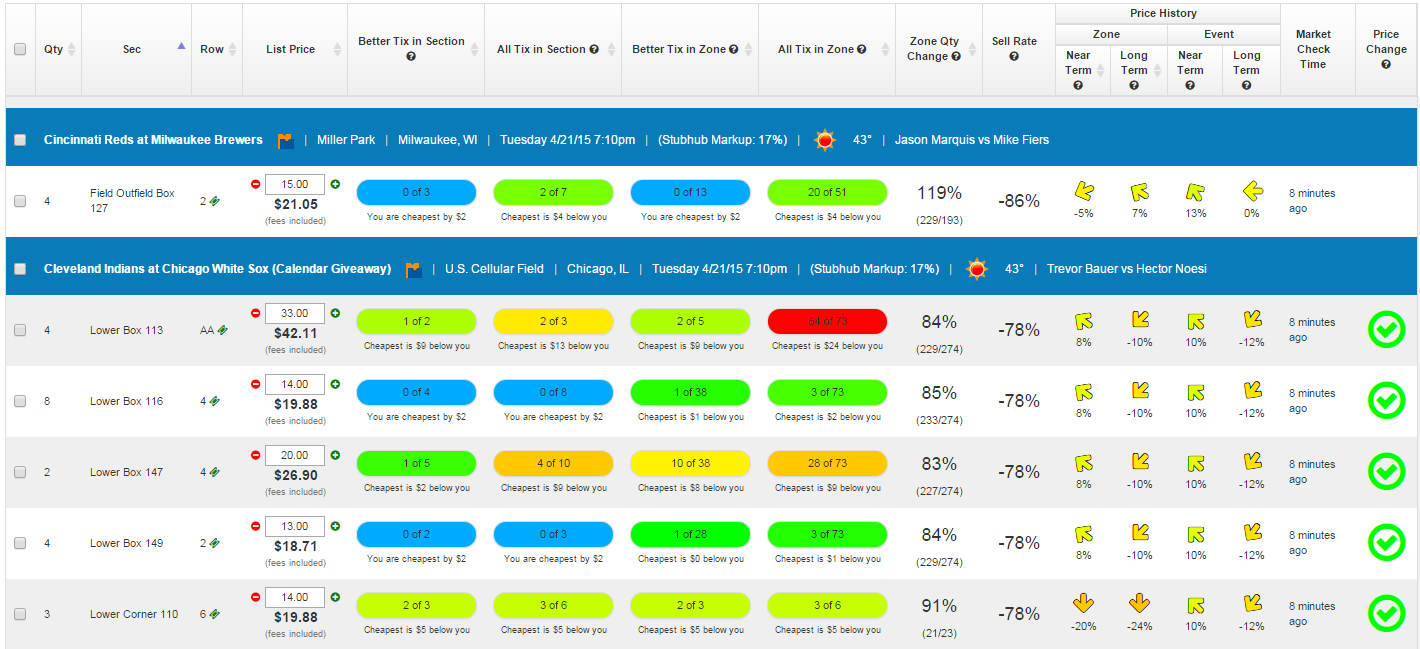
Ticket Price Rankings
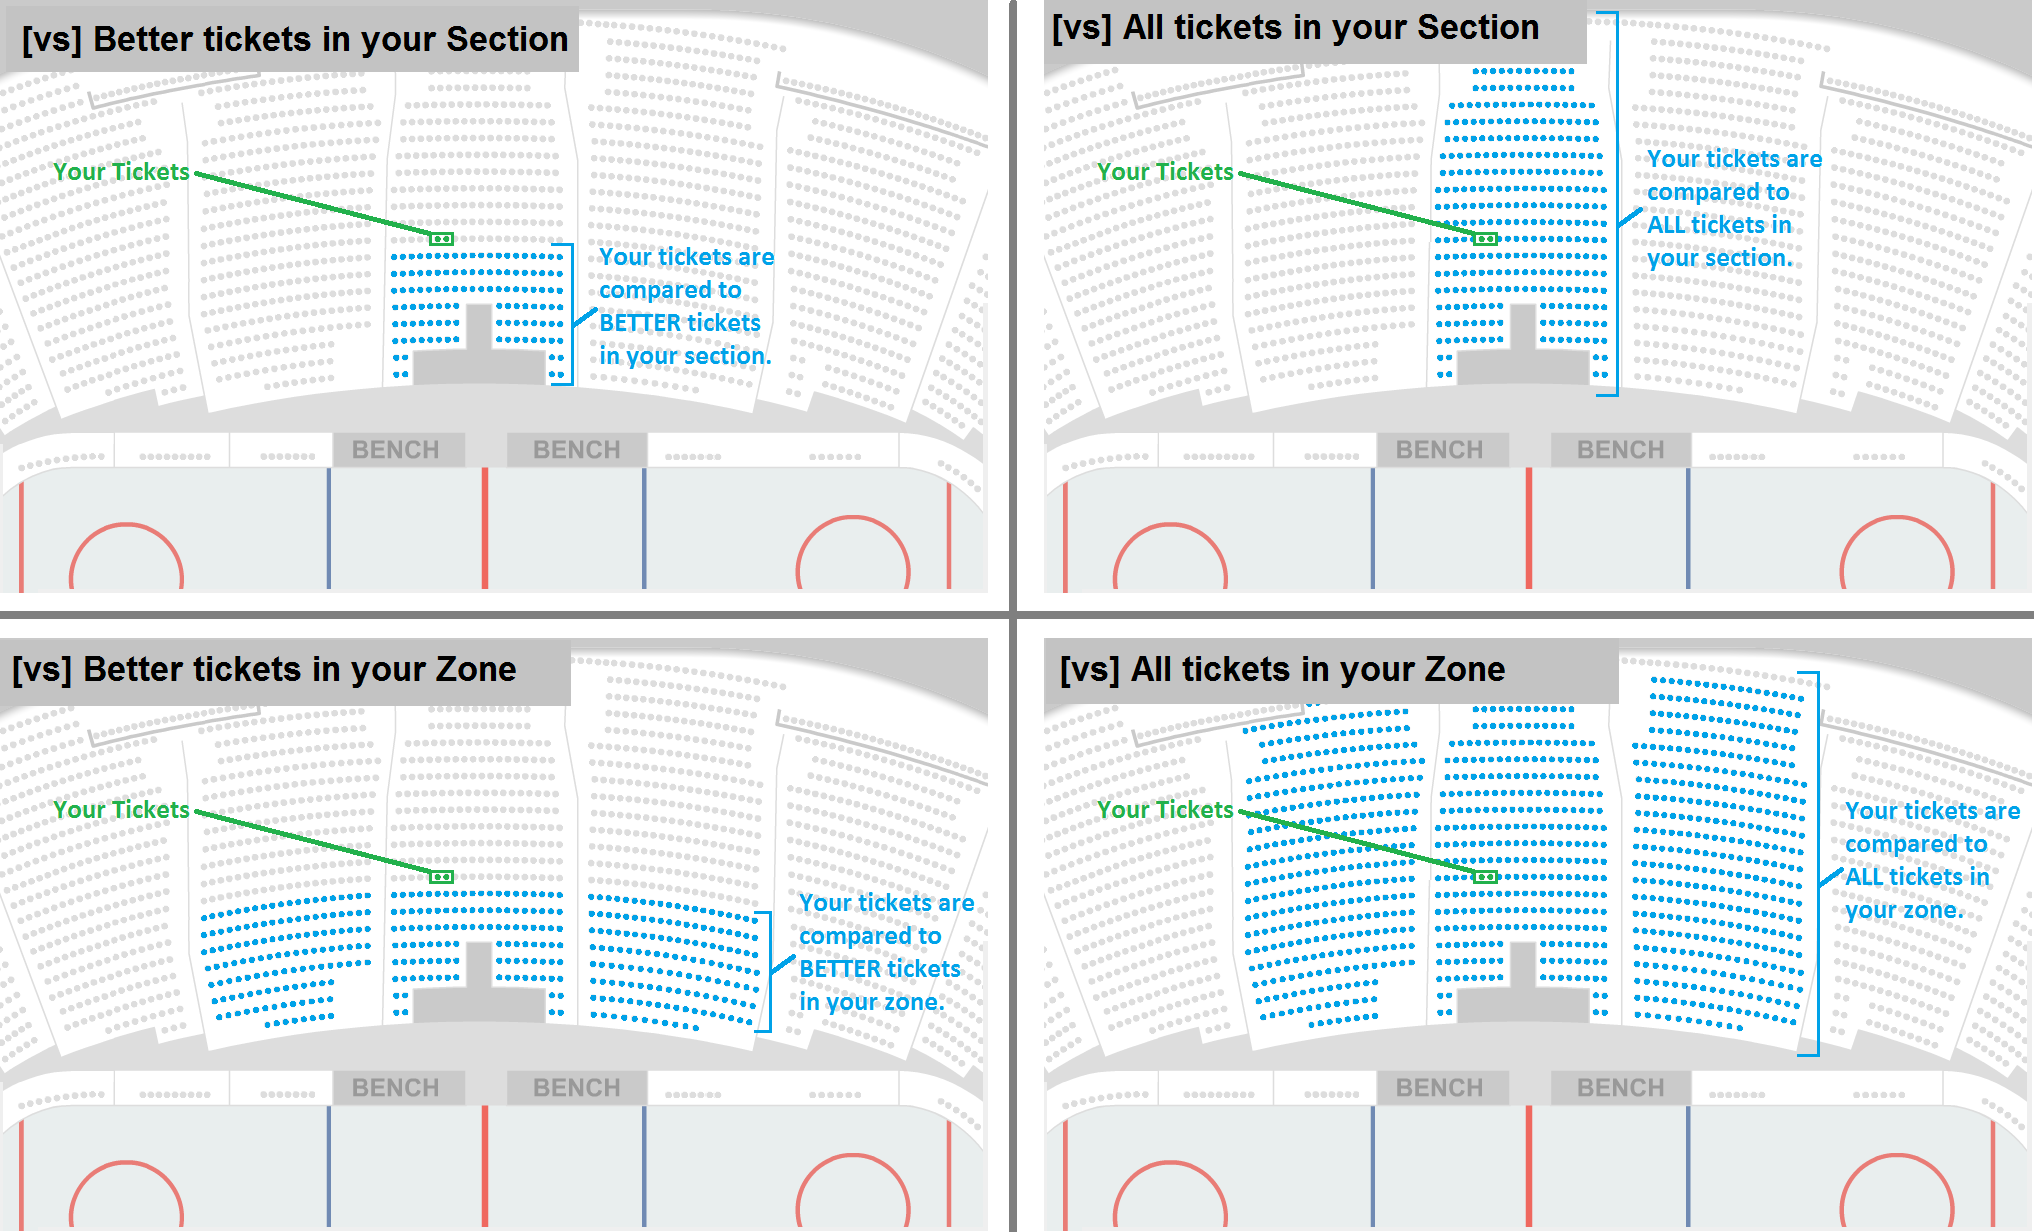
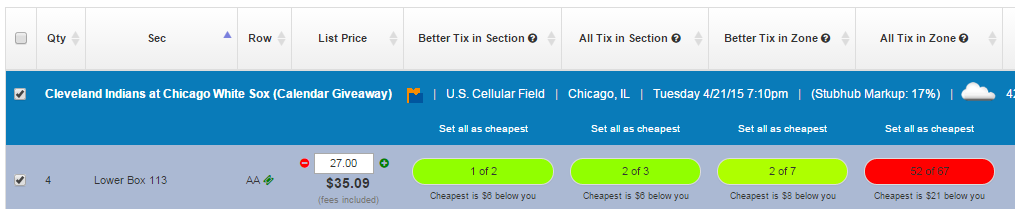
The core of goPricer’s functionality is its ability to compare your ticket prices to the prices of other tickets listed on the secondary market. Your tickets are compared to tickets in four categories: (1) vs. Better tickets in your Section, (2) vs. All tickets in your Section, (3) vs. Better tickets in your Zone, and (4) vs. All tickets in your Zone.
For each ticket, four ovals are colored according to how your ticket price compares to other tickets in that category.

Blue = You are the cheapest ticket in that category.
Green = Your ticket price is approximately 10% higher than the cheapest ticket in that category.
Yellow = Your ticket price is approximately 20-40% higher than the cheapest ticket in that category.
Red = Your ticket price is more than 50% higher than the cheapest ticket in that category.
The numbers within the colored oval tell you how many tickets fall into that category, as well as how many of those tickets are cheaper than your ticket. For example, ’40 of 70′ in the rightmost oval of the screenshot above means that there are 70 other ticket listings in that zone, of which 40 are priced below your ticket.
By default, the ‘Better in Section’ and ‘Better in Zone’ categories only include tickets that are in an equal or better row than the row your ticket is in. However, you can change these Settings so that goPricer also includes tickets that are up to X rows behind your ticket.
Note that single tickets are NEVER included in these comparisons (unless your listing is for a single ticket itself). However, you may change these settings within the Quantity Comparison tab on the Settings page.
Also note that if you upload to StubHub via a CSV file, and have Incentive Discounts on certain events, we do indeed factor in those discounts when comparing your ticket price to other tickets on the market.
Modifying Zones
By default, all sections within a zone are included in the ‘Better in Zone’ category. For example, if your ticket is in Bleachers 181 at Progressive Field, then tickets in all the sections within the ‘Bleachers’ zone (Bleachers 180, Bleachers 181, Bleachers 182, Bleachers 183, & Bleachers 184) would be included in that category. If you’d like to modify the zone so that it only includes specific sections, click the ‘Modify Zone’ link above the corresponding oval. Note that this link will not be present for venues that are General Admission, or for venues that have not yet been scrubbed.

Within the Modify Zone window, you can chose the sections that you wish to be included in your Custom Zone.
For some venues, goPricer will present you with a ‘Suggested Zone’. The idea behind a Suggested Zone is simple: we save you time by modifying the zone so that you don’t have to do it yourself. Our Suggested Zones include mirror sections, as well as all other sections within the zone that are better than your section. Whether or not you’d like to use the Suggested Zone is your choice; you always have the option to modify the zone manually.
Once you have applied the Custom Zone, there will permanently be a bold boarder around the Better in Zone oval for all tickets affected by this Custom Zone.
When you create a Custom Zone, it is automatically applied to all tickets that you have listed in that section at that venue. However, Custom Zones are not applied to different configurations of the same venue; if you create a Custom Zone for a hockey game at Madison Square Garden, that zone will be applied to all other hockey games, but not to basketball games or concerts.
Note that there is no Row designation within the Modify Zone feature, since by default, tickets are only included in the Better in Zone category if they are equal to or better than the row of your listing. If you’d like to also include tickets that are up to X rows behind your ticket, you can set this globally via the Settings page.
For example, lets say you have season tickets in Row 5, Row 9, and Row 13 of Bleachers 181 at Progressive Field. You want to create a Custom Zone for these tickets that includes Bleachers 180, Bleachers 181, and Bleachers 182. To do this, you can click the Modify Zone link on any of your three listings, and it will be applied to all of them.

For the Row 5 tickets, the custom zone would include tickets in Rows 1 through 5 in Bleachers 180, 181, 182.
For the Row 9 tickets, the custom zone would include tickets in Rows 1 through 9 in Bleachers 180, 181, 182.
For the Row 13 tickets, the custom zone would include tickets in Rows 1 through 13 in Bleachers 180, 181, 182.
If, one week later, you add some tickets to you inventory in Bleachers 181, Row 17, the same Custom Zone that you previously created would automatically applied, and would included tickets in Rows 1 through 17 in Bleachers 180, 181, 182.
Note that Custom Zones are only applied to the Better in Zone category; the other three categories (Better in Section, All in Section, All in Zone) will not be affected in any way by Custom Zones that you create.
To delete a Custom Zone that you’ve already created, simply click the Modify Zone link and use the ‘Select All’ option to include all sections in the zone. Once you submit your changes, goPricer will recognize that the your Custom Zone matches its original unmodified form, and will remove the bold boarder around the Better in Zone oval.
Filtering by Ticket Ranking
The ‘Advanced Filter’ button to the right of the Search Box allows you to filter for tickets that are at a specific percentile range compared to other tickets in that section or zone. For example, if you want to see tickets whose prices are in the bottom 30th percentile compared to the prices of other tickets in the Better in Zone category, you could set the filter like this:
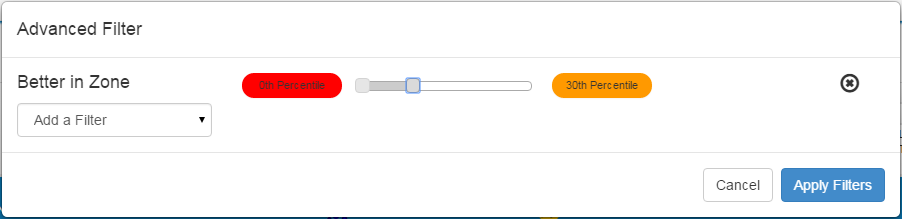
(This would show you tickets whose Better in Zone oval is red or orange-red)
Likewise, if you want to see tickets whose prices are in the top 30th percentile compared to the prices of other tickets in the Better in Zone category, you could set the filter like this:
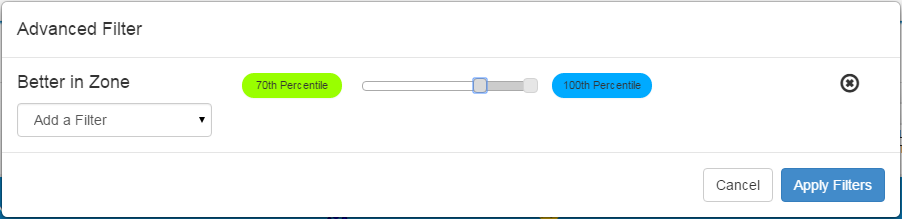
(This would show you tickets whose Better in Zone oval is green or blue)
Quantity Comparison Settings
By default, your tickets are compared to all other tickets, except for single tickets (unless your listing is for a single ticket itself, in which case other single tickets are indeed included in the comparison).
If you’d prefer, for example, to compare your listing of 4 tickets only to other ticket listings with 4+ tickets, you can do so via the ‘Quantity Comparison’ tab on the settings page. Note that this is a global setting that is applied to all your inventory; it cannot be set on an individual ticket basis.
Profit Calculations
For each ticket, goPricer calculates the potential profit that you would earn if your ticket sold at it’s current list price. This profit is based on the cost that you entered for the ticket within your POS. Note that the profit calculation factors in the commission fee that you are charged when your tickets sell. By default, this fee is set at 10%. You can change this fee via the ‘Profit Calculation’ tab on the settings page.
Additionally, goPricer shows you the Net Profit for all tickets that you have listed for an event in the blue header bar for that event.
Changing Ticket Prices
Ticket Prices can be changed by using any of the four methods listed below.
Note that with all of these methods, there is a 60-second delay before the price change is pushed live. During this delay, the price change can be cancelled simply by clicking anywhere on the countdown timer.
Otherwise, the price change is automatically pushed live once the countdown timer reaches zero. The price change will be posted immediately to Vivid, and will populate through to other exchanges within a few minutes.
Price Change Methods:
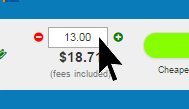
1. Enter a new numerical value or click the ‘+’ or ‘-‘ symbols.
2. Scroll up or down with your mousewheel. Note that you must first click within the white price box, and keep your pointer within this box, to execute price changes via mousewheel.
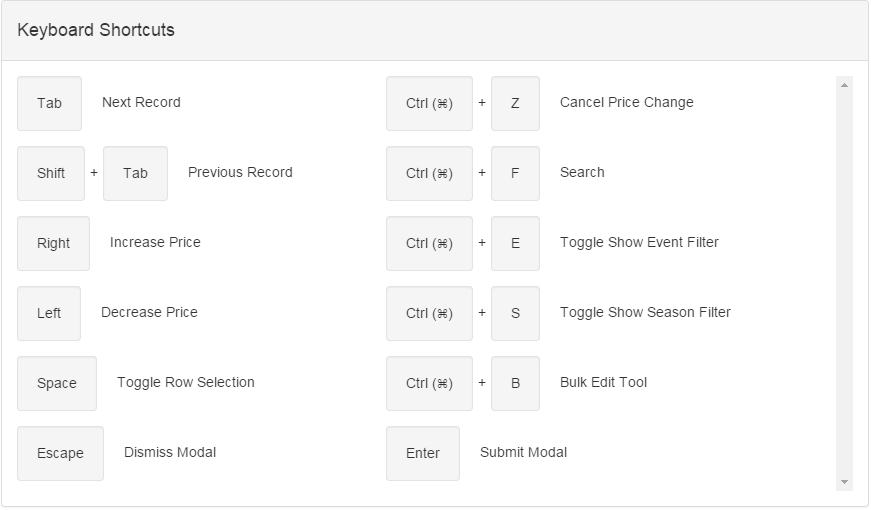
3. Use keyboard inputs. To enter the keyboard input mode, press the ‘Tab’ key on your keyboard. You can then use the following shortcuts:
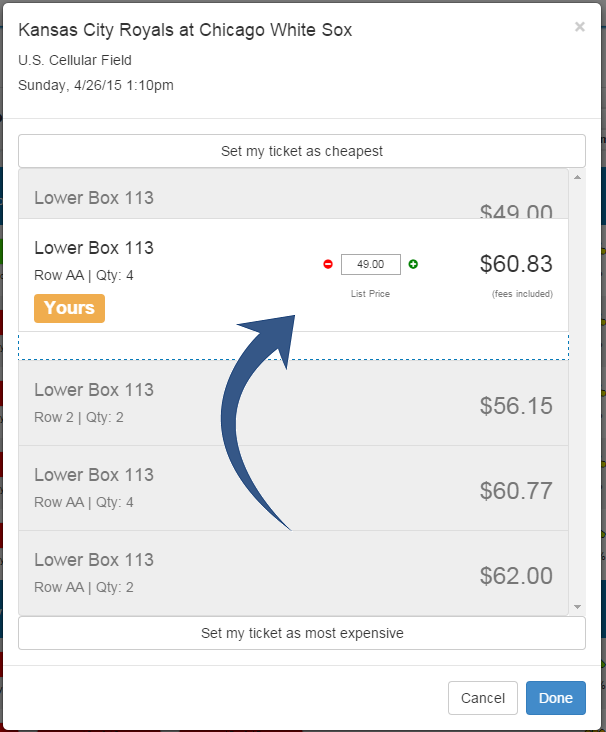
4. Use the drag-and-drop interface. To enter this mode, click on any of the four colored ovals to bring up a list of all tickets in that category. Then, simply drag-and-drop your ticket to a position between two other tickets. By default, goPricer and sets your price to be halfway between the two tickets that you’ve dropped it between. Alternatively, you can have goPricer undercut the more expensive of the two tickets that you’ve dropped your ticket between. You may choose which strategy you’d like to use via the ‘Drag and Drop’ tab on the Settings page.
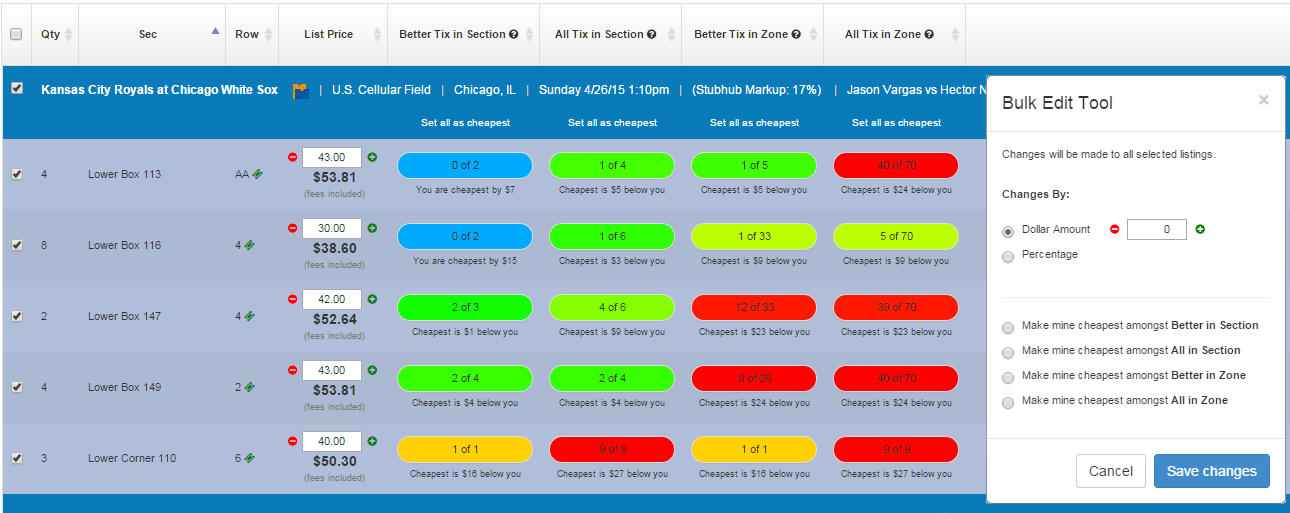
Bulk Editing
After you’ve selected multiple tickets, you can Bulk Edit in a number of ways:
1. Click ‘Bulk Edit’ in the top right of the screen
You can now change your ticket prices, either by dollar or percentage increments. The colors and calculations within the ovals will instantly update with each price increment.
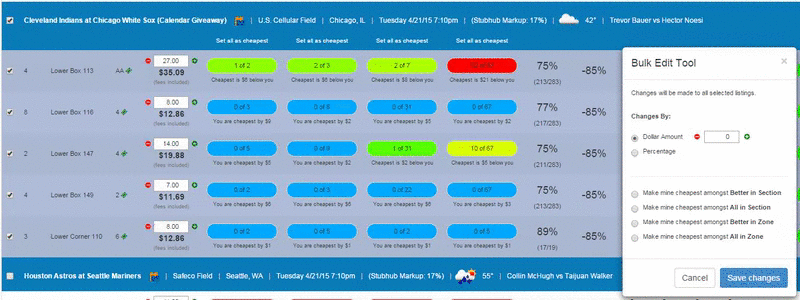
Alternatively, you can set all your tickets to be cheapest within any of the four categories (Better in Section, All in Section, Better in Zone, All in Zone) by selecting the corresponding radio button. Note that this function will only price your ticket below tickets that match the rules you’ve set in your Quantity Comparison Settings. To further fine tune this feature, see the Set as Cheapest Settings.

2. Instead of using the ‘Bulk Edit’ button in the top-right of the screen, you can use the ‘Select All’ checkbox in the blue header bar for a specific event. This will populate four choices within the blue header to allow you to set all of your tickets for that event to be the cheapest amongst whichever of the four categories you choose.
Set as Cheapest Settings
By default, when you click the ‘Set as Cheapest’ button, goPricer will price your ticket below all other tickets in that category that abide by the rules you’ve set in your Quantity Comparison Settings.
To further fine tune this feature, there are some additional settings that you can set via the ‘Quantity Comparison’ tab on the settings page:
- Option to ‘Ignore my Listings’. With this setting enabled, the Set as Cheapest button will not price your ticket below other tickets if those tickets are your own inventory.
- Option to ‘Ignore Lowball Listings’ (and ‘Lowball Indicator Threshold’). When this setting enabled, the Set as Cheapest button will ignore listings that undercut the next listing by the specified percentage.
For example, lets say your ticket is priced at $80, and the other listings in that category are priced at $40, $70, $85, and $95. With the ‘Ignore Lowball Listings’ feature enabled, clicking the ‘Set as Cheapest’ button would price your ticket at $69 (rather than pricing it at $39).
Market Data
goPricer gives you a number of metrics to help you evaluate where the market is heading for any given event:
Zone Quantity Change:
This value shows the quantity of tickets currently listed in your zone compared to the quantity listed one week ago.
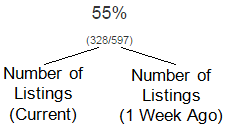
In the figure above, ‘55%’ indicates there were 597 tickets listed in this zone one week ago, and now there are only 328 (55%) left.
The percent will be over 100% if there are more tickets currently listed in this zone than there were one week ago.
The values in the parenthesis show the two quantities that the percentage was calculated from.
Price History:
Price History simply shows you whether prices are rising or falling for this event.
Price change values are based on the 10th-percentile listing price for either the Zone or whole Event. Listings for single tickets are excluded from these calculations.
‘Near Term’ designates the price change over the past 7 days; ‘Long Term’ designates the price change over the past 30 days.
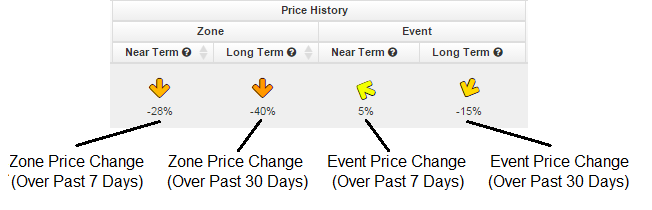
The complete 90-day price history for either the Zone or the whole Event can be brought up by hovering over one of the corresponding arrows: